Add a Service Agreement
A Service Agreement (SA) — also known as Authorization, Notice of Authorization (NoA), or Prior Authorization (PA) — is required in order to provide services to a Client. The agreement sets the number of hours and/or dollars you can provide for services. It includes other relevant information like procedure codes.
Before you start, make sure your Client already has a Payor and Care Period set up, as well as a diagnosis code.

To add a Service Agreement:
-
Go to Clients > Current Clients and click on the Client.
-
Go to the Care tab.
-
Find your Care Period and click the Add Service Agreement icon under the Actions column.
-
The Select Payor window opens. Select your Payor from the dropdown and click the Proceed to Service Agreement button.
-
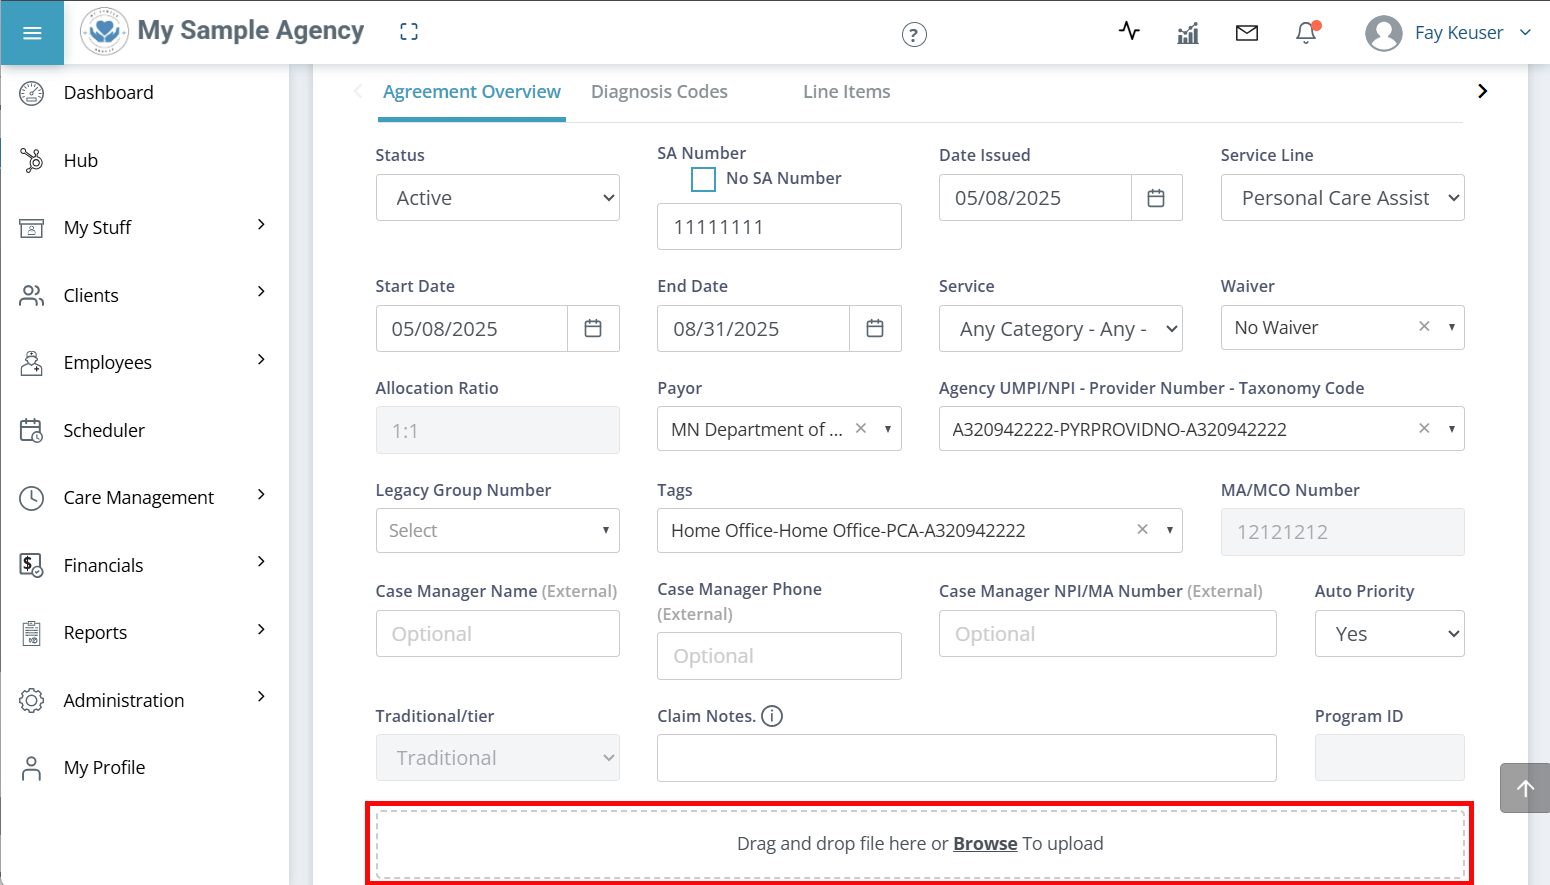
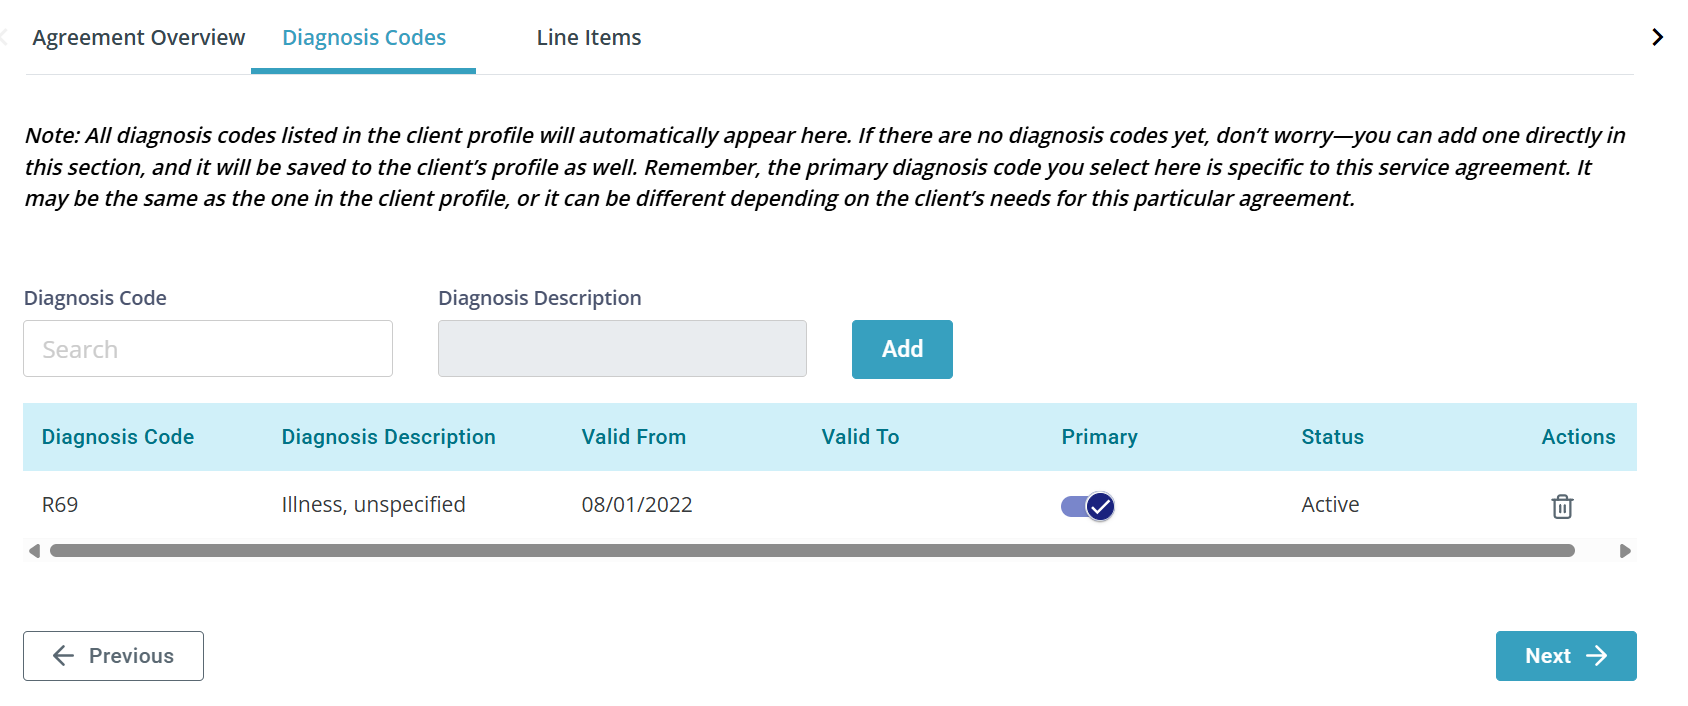
There are three tabs on the Add Service Agreement page: Agreement Overview, Diagnosis Codes, and Line Items. You must complete all three tabs to finish adding a Service Agreement.

The Agreement Overview tab is where you will fill out all basic information from the authorization.
For Minnesota DHS Authorizations, you can click the Upload SA Document button at the top of the page to upload your authorization. The information from the document will pull into the form. Make sure to check the data for accuracy.
-
Status is Active by default. The only other option is Interim, which is used when you do not have an updated Service Agreement and need to continue service. For more information, see Interim Service Agreements.
-
SA Number: Add the SA number. If there is no SA number, select No SA Number.
-
Add the Date Issued.
-
Select the Service Line.
-
Add the Start Date and End Date.
-
Select the Service.
-
Indicate if this is a Waiver or not.
-
Review the Allocation Ratio. Choose the highest ratio on the authorization.
-
Select the Payor.
-
Select the Agency UMPI/NPI- Provider Number- Taxonomy Code.
-
Optional: Add a Legacy Group Number.
-
Select a Tag.
-
Optional: Add a Case Manager Name, Case Manager Phone, Case Manager, NPI/MA.
-
Set Auto Priority. The default is Yes.
-
Auto Priority allows you to decide in which order the units for the different procedure codes is used. DSS service lines cannot use Auto Priority.
-
If you select No, your Caregivers using electronic visit records will need to select the code when entering time. For Housing and Skilled Services you must select No.
-
Anything with remote/in person services must be set to No.
-
-
Review Traditional/Tier. In most cases, this is Traditional.
-
Optional: Add Claim Notes. This note will go out on the claim and should not be used for any other purpose.
-
Review Program ID.
-
Optional: Attach a copy of the authorization in the drag and drop section at the bottom of the page.
-
Click the Next button at the bottom of the page.

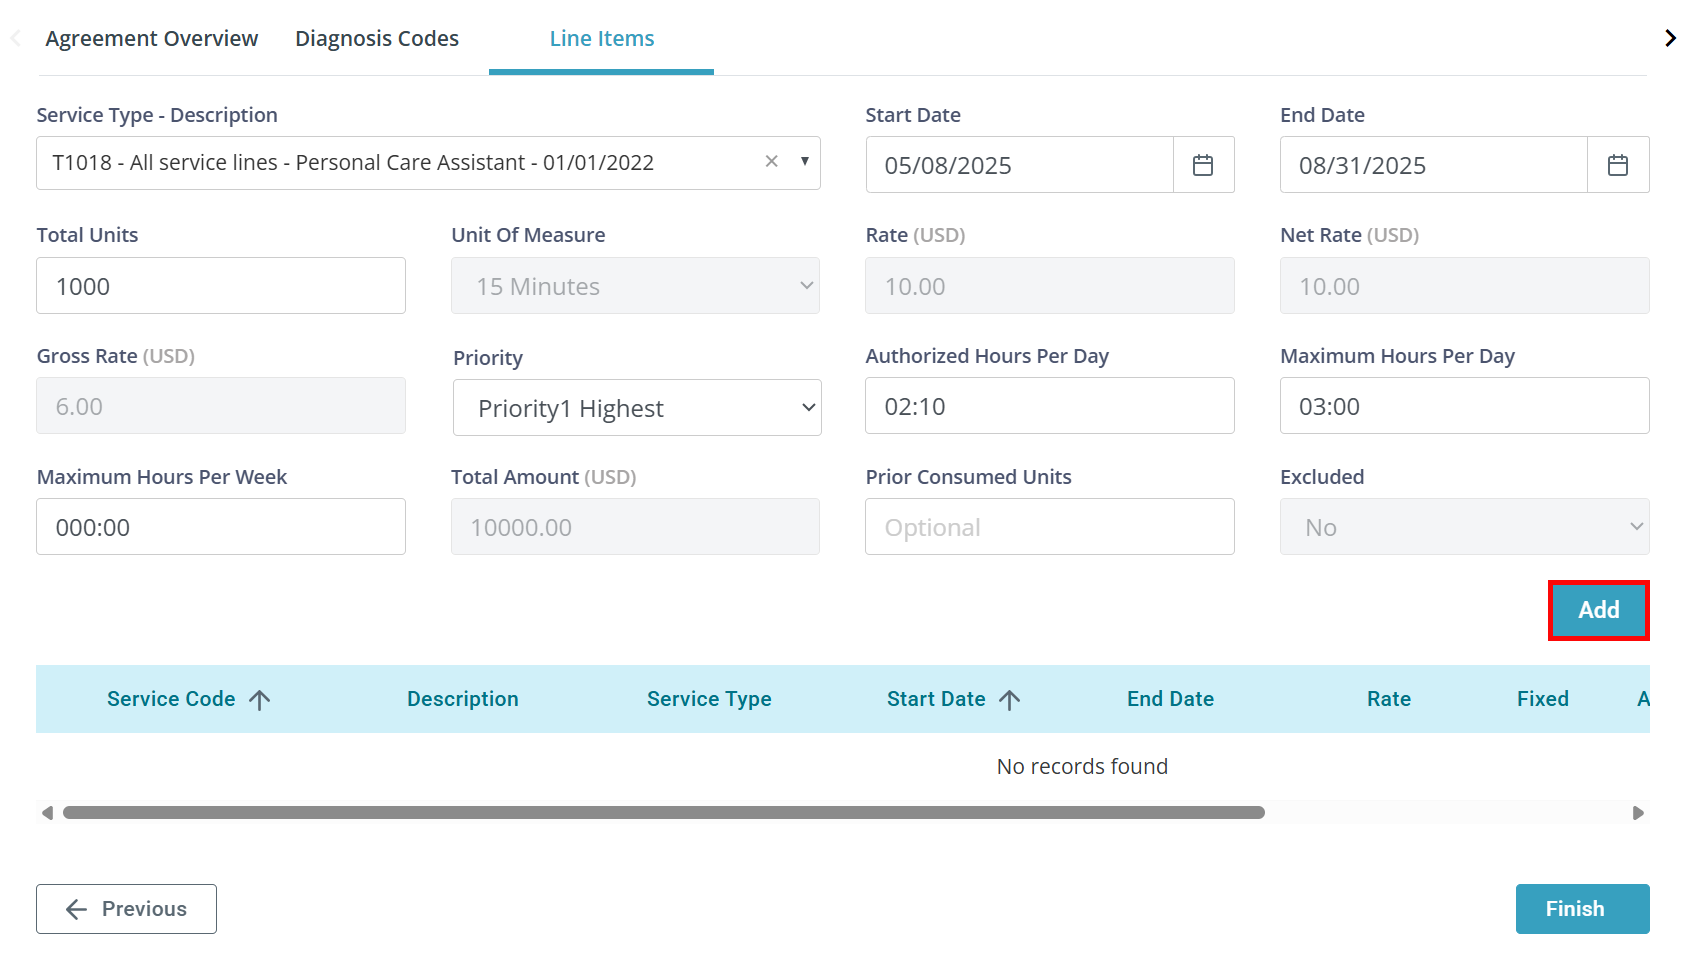
The Line Items tab is where you will add the Procedures/Service Codes associated with the Service Agreement. There can be one Line Item or several.
-
Select Service Type – Description. These are your HCPCS procedure codes.
-
Add a Start Date and End Date.
-
Add Total Units. As you add this, the Total Amount field is adjusted for you.
-
Select Unit of Measure. This may be selected for you.
-
Add a Rate.
-
Fixed rate services are applied automatically based on the service code/waiver selected.
-
Non-fixed rate services must be entered manually. When these rates change, they must be manually updated by ending the current line item and starting a new line item with the new rate.
-
-
Set Priority. Use this when you have more than one Service Type/Procedure Code. Prioritize how you want the units applied. For example, priority 2 is applied before priority 3, and so on.
-
The system shows Authorized Hours Per Day. Your authorization may or may not require this. This is a calculation of the total hours available for the date range selected.
-
Add Maximum Hours Per Day. Your authorization may or may not require this. There is a validation on the app, web, and paper timesheets to verify hours remaining for the day. There is a warning in Approve Visits and overrides to bypass the validation for both time entry and billing.
-
Add Maximum Hours Per Week. Your authorization may or may not require this. If added, there is a validation on the app, web, and paper timesheets to verify hours remaining for the week. There is also a warning in Approve Visits and overrides to bypass the validation for both time entry and billing.
-
Optional: Add Prior Consumed Units. These are any units that were used on this authorization and billed through a different system.
-
Click the Add button.
Added Line Items appear at the bottom of the page. You can edit a Line Item by clicking the Edit icon or inactivate a Line Item by clicking the Paper icon.
-
Repeat steps 1-11 for additional codes.
-
Click the Finish button at the bottom of the page to finalize the Service Agreement.

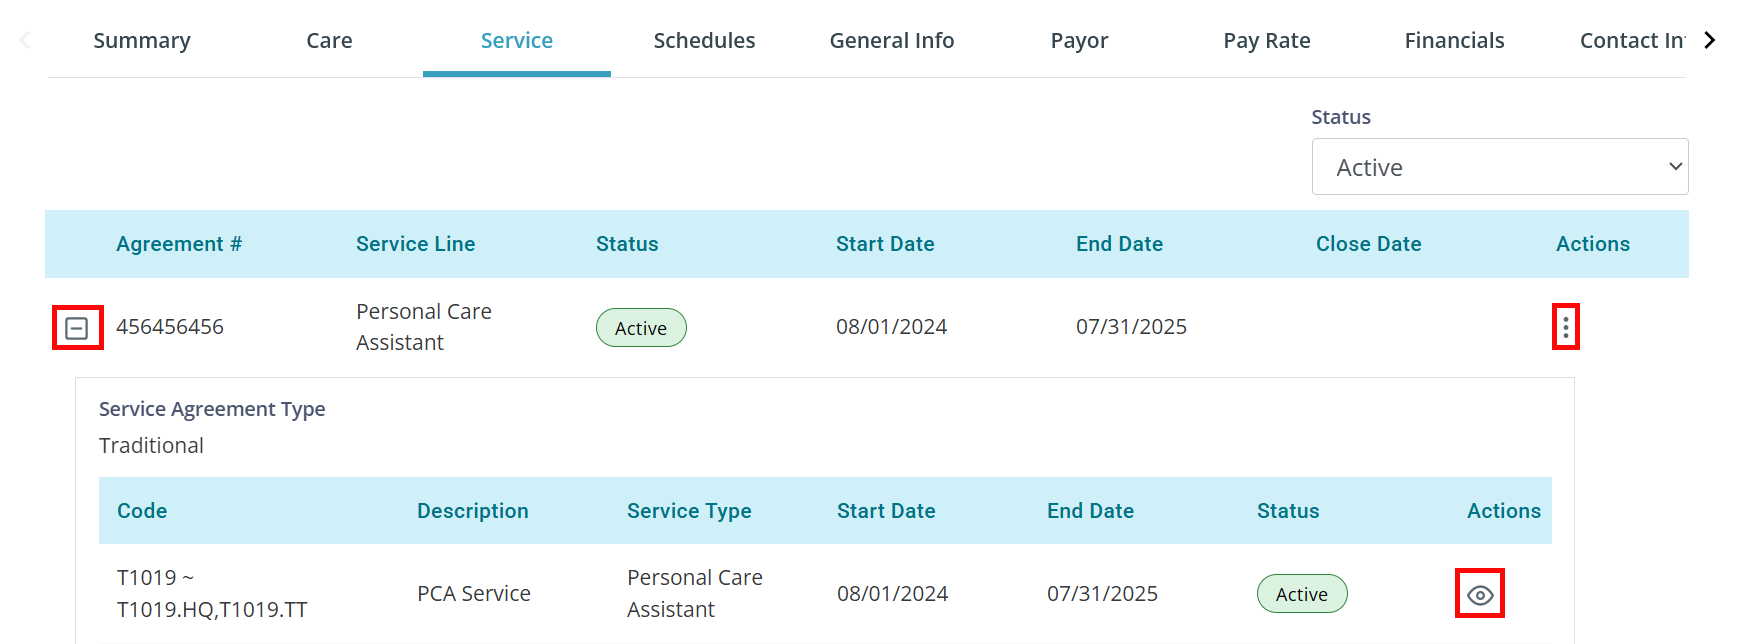
You can view all of a Client's Service Agreements on the Service tab in the Client's Profile.
-
Click the + (Pictured here as a -) to view the associated Service/Procedure Codes.
-
Click the Eye icon to view more information about these codes.
-
Click the Ellipses under the Actions column to:
-
View SA: To review all details of the Service Agreement.
-
Edit SA: To change the Service Agreement.
-
Clone SA: To make a copy of the Service Agreement.
-
View Units: To look at units usage.
-
Download SA: To get a physical copy of the uploaded Service Agreement.
-

To add a Service Agreement for Session-Based Care/Shared Care, follow the instructions above with a few changes:
-
On the Agreement Overview tab:
-
Ensure the Service field selected is more than 1:1.
-
Auto Priority is set to Yes and cannot be changed for session-based services.
-
-
On the Line Items tab:
-
Select the 1:1 Service Code, and in the Shared Code box, select all applicable shared Service Codes.
-
Make sure to add a Care Delivery, and to add the Caregiver(s) to the Client Care Team. ADLs/IADLs/Outcomes will display in the Pavillio Mobile App for the Caregiver to chart for each visit

To add a Service Agreement for ICS, follow the instructions above with a few changes:
-
On the Agreement Overview tab:
-
Select Home Supports and Services from the Service Line dropdown.
-
Select Residential Habilitation Any 1:1 from the Service dropdown.
-
-
On the Diagnosis Codes tab:
-
Search for and select the ICD10 code. Click Add.
-
-
On the Line Items tab:
-
Search for and select the T1020.UC code.
-
Enter the Total Units.
Select Daily from the Unit of Measure dropdown.
-
Enter the rate of reimbursement in the Rate field.
-
Set the Priority to Priority 1 Highest.
-
Leave the Maximum Hours Per Day set to 24:00.
-
Click Add.
-
Click Finish.
-


