Add a Schedule
A Schedule can be added for Visits or Events, and can be added as one-off appointments or on a daily, weekly, or monthly cadence.

There are 4 Schedule types you can use:
-
Event: An Event is used for scheduling meetings, in-service trainings, open houses, clinical appointments, and any other occasions that are not related to a Service Authorization. Events are marked on the calendar in orange.
-
Individual Visit: An Individual Visit is used for standard Visits where a Caregiver or QP/RN works with a Client. Individual Visits are marked on the calendar in blue.
-
Location: Location is only available for Day Support Services (DSS) or Foster Care. This allows you to assign an Employee to be at a specific location at a designated time. Locations are marked on the calendar in pink. Employees can clock-in at a location via My Stuff > My Locations.
-
Shared Care: Shared Care is used for Visits where the Caregiver takes care of more than one individual in non-DDS/Foster Care setting. Shared Care is marked on the calendar in green.

All non-event schedules must fall within an active Service Agreement, and can be scheduled up to a year in advance.
To add a Schedule:
-
Click on Scheduler in the lefthand menu.
-
Click the + New Schedule button.
-
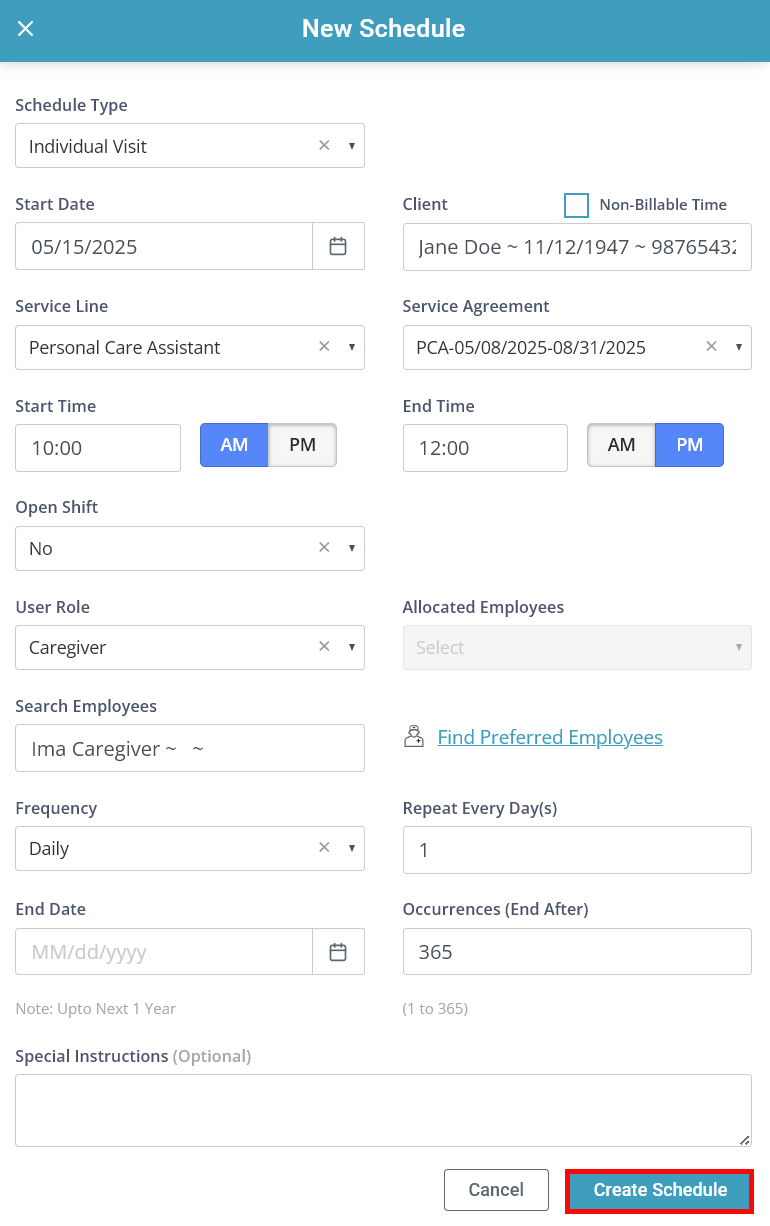
The New Schedule panel opens.
Select the Schedule Type from the dropdown menu.
-
If this is a non-billable schedule, select Individual Visit and select the Non-Billable Time checkbox. Select the non-billable Activity from the dropdown menu.
-
To use the Non-Billable Schedule, you must first have Non-Billable Activities and Non-Billable Rates set up in Administration > Masters.
-
-
Add a Start Date.
-
Search for and add the Client.
-
If the Client has one Service Line or Service Agreement, it is populated for you.
-
If the Client has more than one service line, select the appropriate one under the Service Line dropdown menu. The Service Agreement is populated for you.
-
You can only add a schedule for one Service Line/Agreement at a time.
-
-
Add the Start Time and End Time.
-
Select whether it is an Open Shift or not.
-
Select the User Role.
-
Select an Employee. This can be an Allocated Employee, an employee connected to that client. You can also Search for Employees or find Preferred Employees. For Events and Locations, you can add more than one Employee here.
-
Add a Frequency. If you leave this blank, the shift will occur once, on the date chosen for Start Date. Otherwise, select one of the following:
-
Daily: The shift should happen every day.
-
Repeat Every Day(s): Add a 1 to show this shift happens every day. A 2 means this shift repeats every other day, etc.
-
-
Weekly: The shift should happen every week.
-
Repeat Every Week(s): Add a 1 to show this shift happens every week. A 2 means this shift repeats every other week, etc.
-
Select which days of the week the shift should occur.
-
- Monthly: The shift should happen every month.
Repeat Every Week(s): Add a 1 to show this shift happens every month. A 2 means this shift repeats every other month, etc.
Occurs on:
Day of the month: Specify a day, like the 15th of the month.
On the X of the month: Specify a date and day, like the 2nd Wednesday of the month.
-
-
Add End Date or Occurrences.
-
End Date: Add a date. Visits will end after this date. You can schedule for up to one year in advance.
-
Occurrences (End After): Add a number up to 365. Visits will end after this number.
-
-
Add Special Instructions if desired. These show under My Stuff.
-
Click Create Schedule.

Use Event schedules for Employees, Clients, or both. They are perfect for in-services, open houses, and more. For Clients, add an Event when you want to block time that is not tied to a Service Authorization (medical appointments, etc.)
To use the Event schedule type, you must first have Events set up in Masters. To set up Events:
- Go to Administration > Masters > Event.
-
Click the + Add Event button.
-
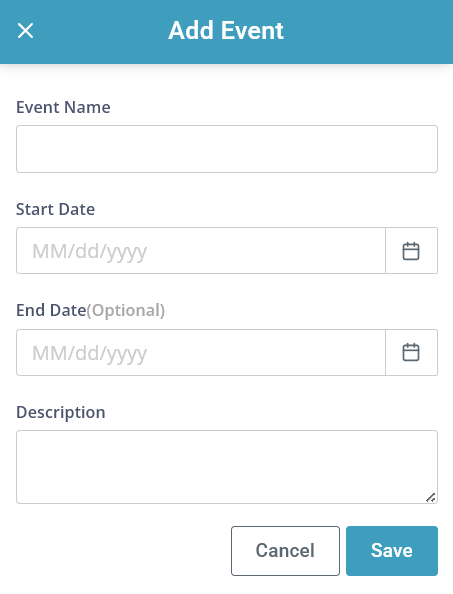
The Add Event panel opens.
Type the Event Name.
-
Add a Start Date. An end date is optional.
-
Add a Description.
-
Click Save.
The event is available in theScheduler.

